
First Show 2013

Sheep Pasture ‘P4’
Yesterday I went to the CMRA show at St Albans for a day out. It was pretty much what I expected of the show, which has always been a good regional event. Spread over three floors of the civic centre it is compact and bijou for a show, with indifferent lighting. There were as usual with St Albans a good selection of layouts with a couple of notable ones that caught my eye. One thing I like about St Albans is their exhibition manager rarely picks a ‘Ready to Run’ layout, pretty much all of them show a good cross section of modelling skills from completely scratch built to those that use commercial products but in a way that makes them stand out.

Sheep Pasture ‘P4’

Sheep Pasture ‘P4’
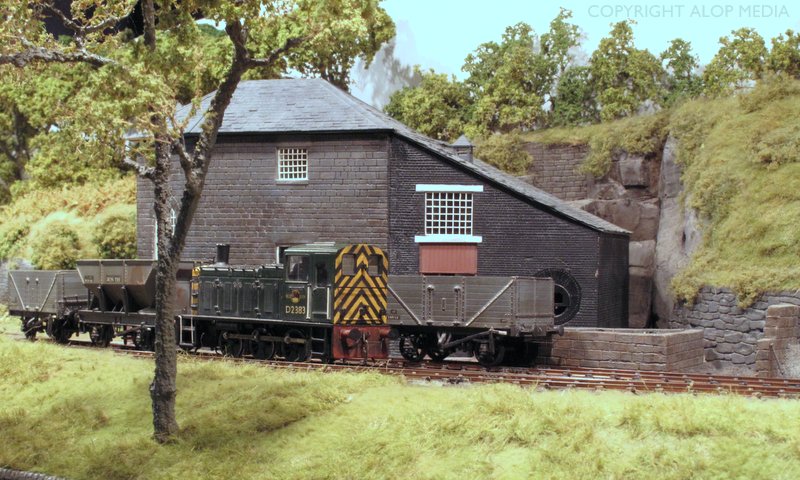
Sheep Pasture ‘P4’
Sheep Pasture is a layout that has been around for a while, it is however well worth looking out for capturing the High Peak rail system of Derbyshire really well, the landscape textures are paricularly well done.

St Juliot ‘S’Scale

St Juliot ‘S’ Scale
St Juliot was a brilliant example of a compact layout in this scale ( ‘S’ 1/64th). The whole baseboard is designed to fold up to make one easily portable unit. This is the sort of idea that is well worth seeking out, the pre group era may not be your thing, but the baseboard design just might be. So like an earlier posting regarding ‘nothing to see here’ http://nuthin-to-see-here/ regarding real life, a closer look at a layout thats not initially of interest may well reap real rewards in another field of modelling completely.
Earl’s Court ‘OO’
Earl’s Court was another eye catcher as normally micro style layouts do nothing for me, however this layout is really well thought out and really well modelled. With this layout the more you look, the more you see, so if its at a show you’re at, spend some time on it. The whole scenic display as well as carefully chosen stock, depict West London in the early 1960’s brilliantly. There’s more pictures here http://ecmr.webs.com/ and a couple on Chris Nevards blog http://nevardmedia.blogspot. where he too was taken by the atmosphere of this very simple layout.
Another example of modelling the 1960’s, (not at St Albans) which I’ve recently added to the blogroll at the right hand side is Andy Coopers EM gauge ‘New Hey’ layout, http://newhey.wordpress./ In Mr Coopers normal style the entries will range from taking the piss http://newheytoilet-humour/ to useful techy stuff like wheel pulling http://newheymodelrailwaythe-real-design-clever/ drop by and have a read when you’ve got a few spare minutes.
Window Dressing
One of the things I get asked when people see Albion Yard, is how do I fit the glazing on the flush glazed stock and locomotives. The easiest way to describe this is to show you, and this is a bit I wrote for Brian at Shawplan and am reproducing with his kind permission. The glazing technique shown here is the standard one I use, the same technique works across various scales and is a development of how I used to do it the longhand way, when individually cutting glasing panes.

Old style glazing
Since we started producing the glazing we have changed the way we cut the transparency fret. If you’ve bought one of our earlier releases they are on a sprue in a similar fashion to a traditional Airfix kit, and you can see in the following images we’ve used an older fret.

Glazing sheet (current style)
The current windows are supplied as a push out window, see the image of the BR MK1 suburban fret above. There is no difference to the size or shape of the components, but this is a more effective production method, and all future releases are anticipated to be in this style. The laser is set to cut the material so that all you need to do is gently flex the material whilst applying gentle pressure on the window you want and they will drop out. One thing we have found is that window aperatures on models can vary significantly. This is not generally noticeable but when laser cutting it makes a huge difference. If on a fret we indicate a window for a specific aperature or window, please make sure you use the correct one. An easy way to ensure this is to use non permanent OHP pens to mark the window. Even factory paint thickness can have an effect, so often there is a need to just sand the window or aperature to get the flush fit. 1500 wet and dry grade paper is a good starting point to remove very small amounts of material from either the body or the window. For fixing the windows you can use a variety of adhesive materials. I use a very thin gloss varnish so that capilary action runs the varnish around the aperature before drying and setting. PVA or ‘Canopy’ glue can also be used with just a very small amount applied in a corner or around the perimeter of a window. We have been told superglue works but there is the potential of paint damage by chemical reaction ‘blooming’ on some manufacturers finishes, so we would advise particular care if trying that technique.

ViTrains Cl 47 as supplied
This is typical of many diesel and steam locomotives today, take note of any particular pieces that may be light conduits from LED’s before removal.

Remove cab insert
With this model we supply cab and body window glazing, so remove the black inserts for the roof fans, and then the cab interior. Some interiors are glued in so be prepared to cut away glued areas.

Remove all original glazing
On this model gentle inward pressure on the glazing made it fall inwards makeing removal easy. Be prepared as glue amounts vary from model to model within manufacturers ranges. This is true of rolling stock as well as locomotives.

Paint cab window aperatures

Ready for glazing
Once the windows are removed, touch in any areas with the body surround color, this makes a noticeable improvement where there is a thick body side.

Test fit of glazing
Test fit each glazing piece, if possible slide the transparency in as flat as you can this helps it sit better, and any fit problems are easier to see.

Test fitting shows slightly oversize for this window.
If the aperature is too small the glazing will sit ‘proud’ of the aperature. In this instance we used wet and dry to take a few thou from the door pillar and base of the glazing transparency. It’s usually obvious which to work on, the body or the glazing transparency and once you’ve done one or two it’ll become intuitive which is the easier component to work on.

Fitting completed to check seating of glazing.

Fitted windows labelled with non-permanent OHP marker pen
Each glazing panel will be custom fitted to your model, there are two options on fitting. You can fit them as you go fixing them and then moving on to the neext panel after they have set. This particular model has more work to be done to it, so using the OHP pen each panel is marked as is the corresponding window on the model. This means they can be stored safely and fixed after the rest of the conversion work has been completed.

Finished effect.
This is the finished effect, the last touch is to run a black marker pen or paint around the edge of the window glazing, this kills any refraction of light through the edge. The difference can be seen comparing the door(treated), and cab side window. The door window edge has dissapeared, but there’s still a slight refraction on the cab side glazing.

You must be logged in to post a comment.