
Hattons 14xx 48 xx 58xx
H1401 H1402 H1403 H1404 H1405 H1406 H1407 H1408 H1409 H1410 H1411 H1412
H1413 H1414 H1415 H1416
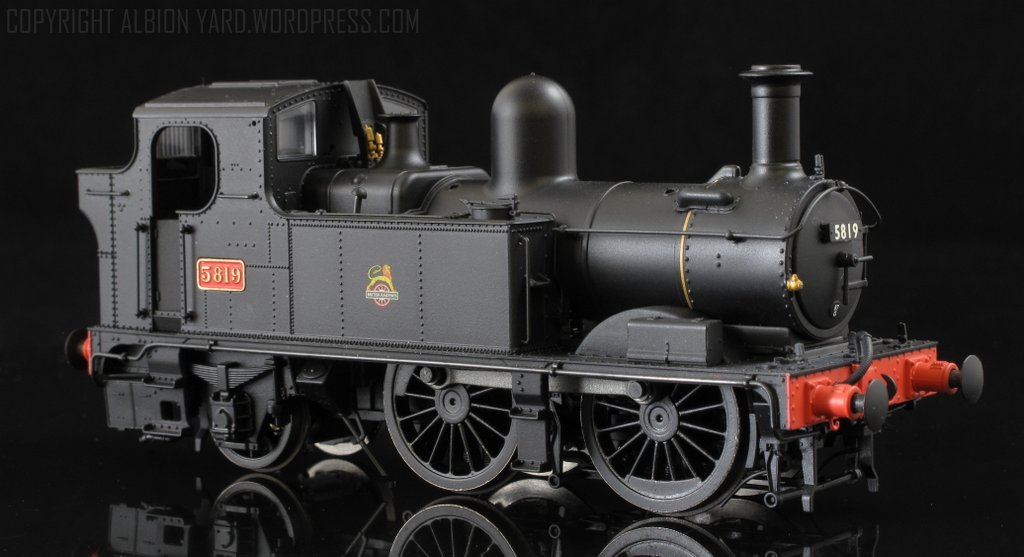
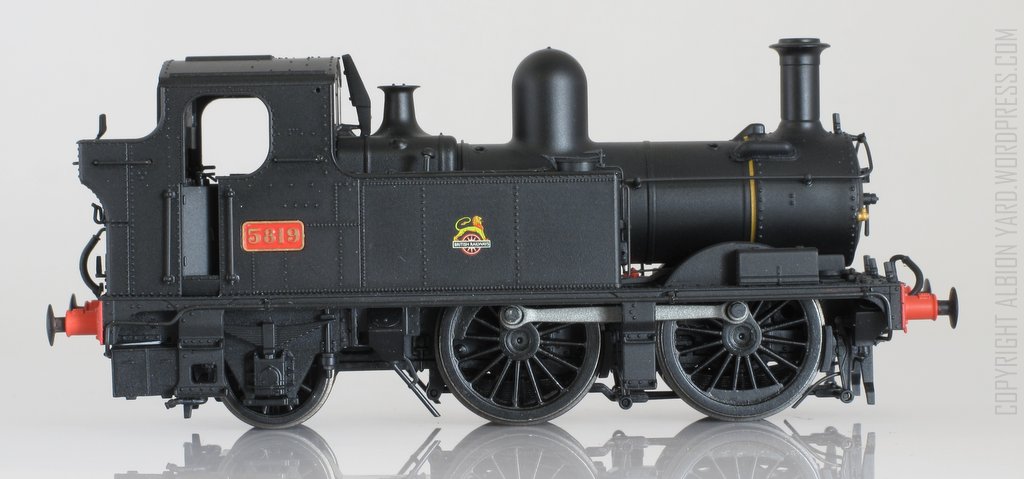
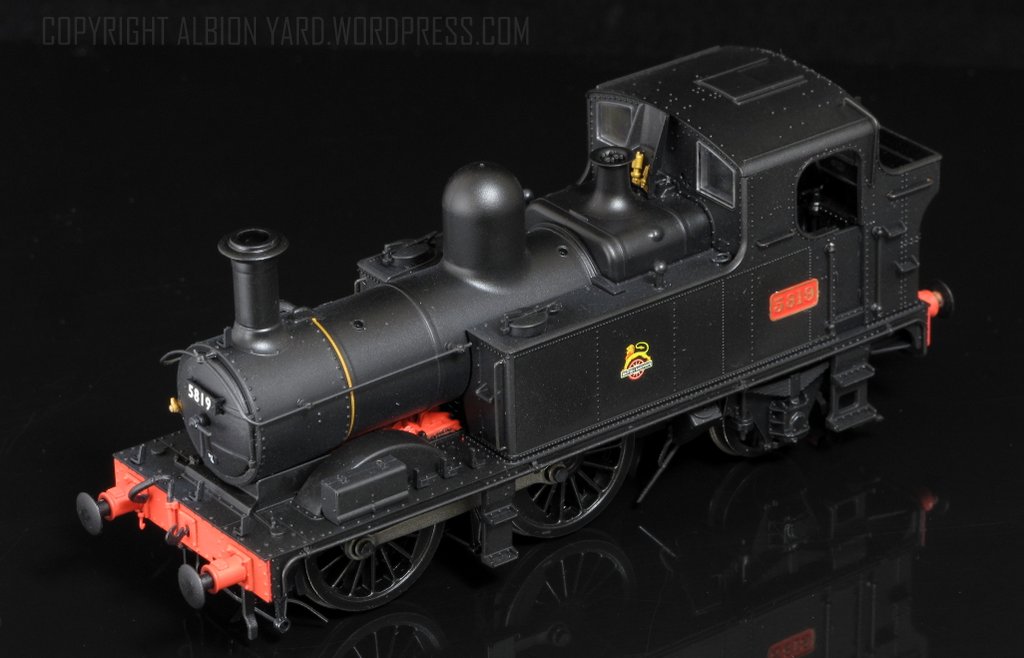
It’s early 2017 and on the desk in front of me is the Hattons/DJM 14xx model. It’s almost a year late from original estimated delivery. Not that that’s an issue, no one dies or died because of it, as far as we know. Late 2014 Hattons announced the project to cover 14xx/48xx/58xx version of the prototype, the one I have here is H1410 58xx 5819 in plain early British Rail black. The announcement included the following paragraph
‘Our new, highly detailed model will be designed and produced in partnership with DJ Models and will set new standards for a ready-to-run small locomotive with levels of detail only previously seen on high quality brass locomotives.’
Hattons 14xx 48 xx 58xx
H1410
For my Forest of Dean (FoD) Project one or two could be useful, they weren’t seen as numerous or particularly regular locomotives in the areas and era I’m interested in, but there were two engines to catch my eye, so I’ve got one here to see if it will work for what I want to do with it. The locomotive immediately looks ‘good’. The packaging is effective, the engine cradled in a vacuum formed tray surrounded by dense foam in a strong cardboard outer box. Very similar to some of the Heljan packaging. The paint finish looked good no obvious blemishes the detail pack was included, with a well illustrated set of instructions, and illustrated parts diagram. Within the paperwork theres no prototype information, it would be nice to have even in a very basic format such as provided by Hornby and Bachmann. No components had fallen or were falling off, and a cursory test on ‘Shelfie’ and rollers proved the locomotive ran reasonably straight out of the box. So happy with the basic check, it was deeper into the mancave for a more detailed look.

Hattons 14xx 48 xx 58xx
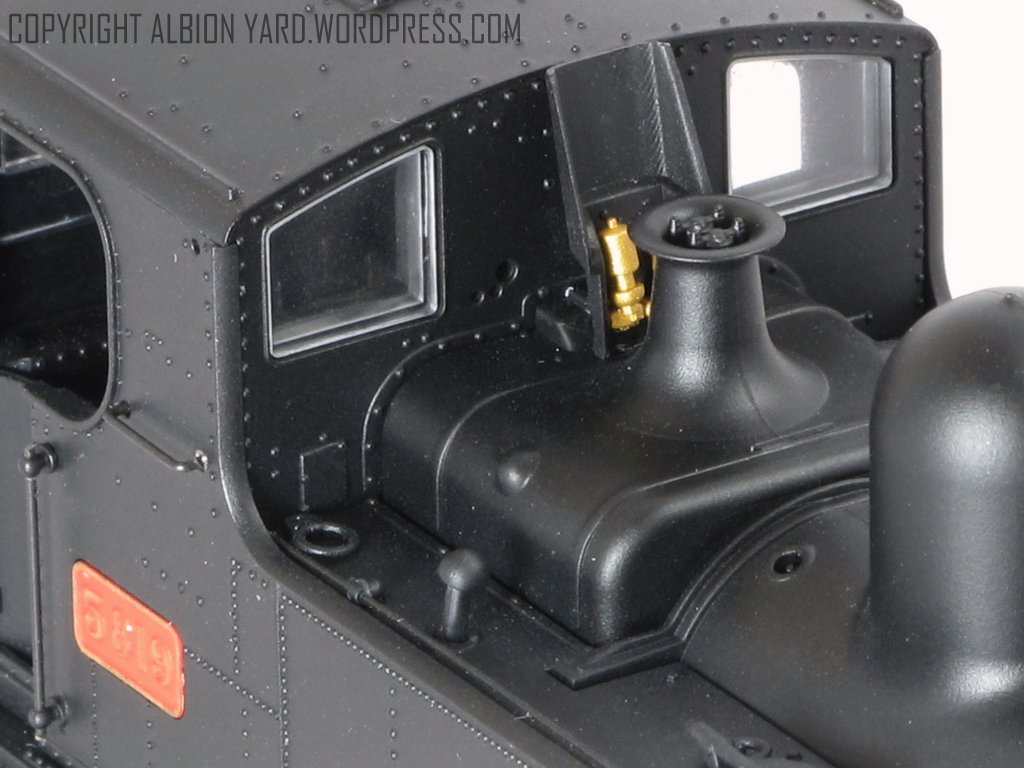
Does it meet the original public customer brief outlined above? For a simple answer, yes and no. As with the DJM fanfare for the J94, reviewed here (j94 ), does it set new standards? No I don’t think it does, unfortunately there’s nothing across the model that I think of as a ‘new standard’, does it set a benchmark (rather than standard) for levels of detail? In one or two areas yes it does, a quick list, separate tank top lift rings, opening cab doors, whistles and whistle guard, smokebox door dart, smokebox steam lance fitting, pipework and conduits across the model, and bunker lamp irons, are the sort of small detail captured incredibly well on this model. Looking to the cab interior that too is very well detailed, both the backhead and the front of the rear cab bulkhead, opening cab doors and it’d be great to see similar features regularly across other manufacturers ranges. With daylight underneath the boiler a representation of the inside motion between the chassis frames is visible and far more effective than the filler plate provided for the DJM J94.
Hattons 14xx 48 xx 58xx
H1401 H1402 H1403 H1404 H1405 H1406 H1407 H1408 H1409 H1410 H1411 H1412
H1413 H1414 H1415 H1416
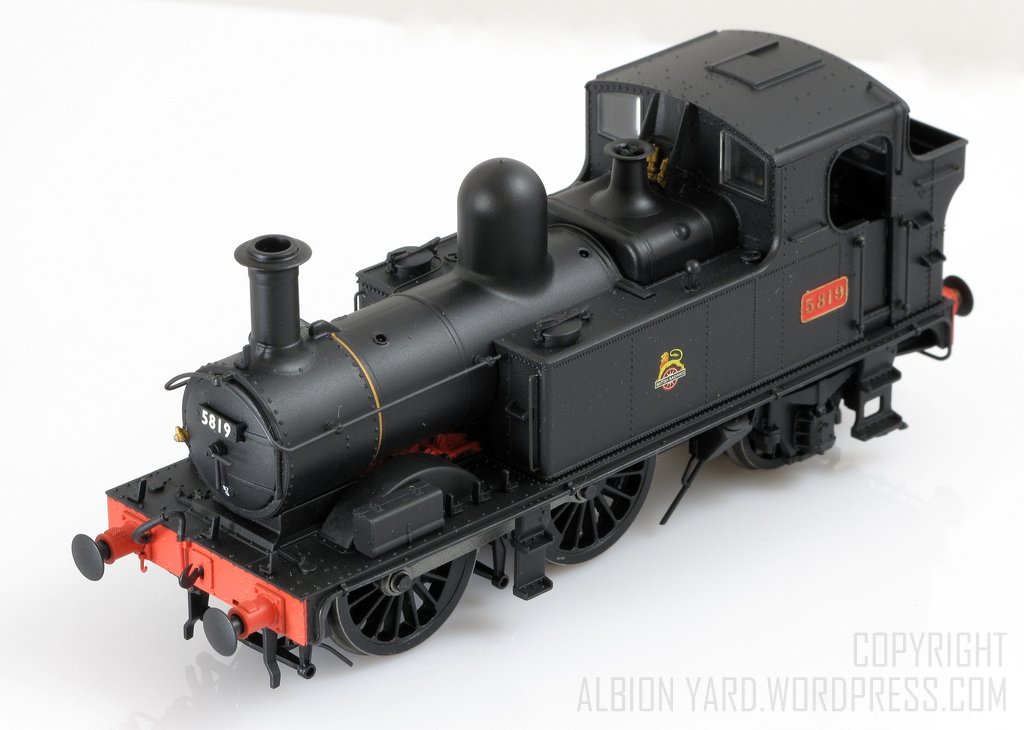
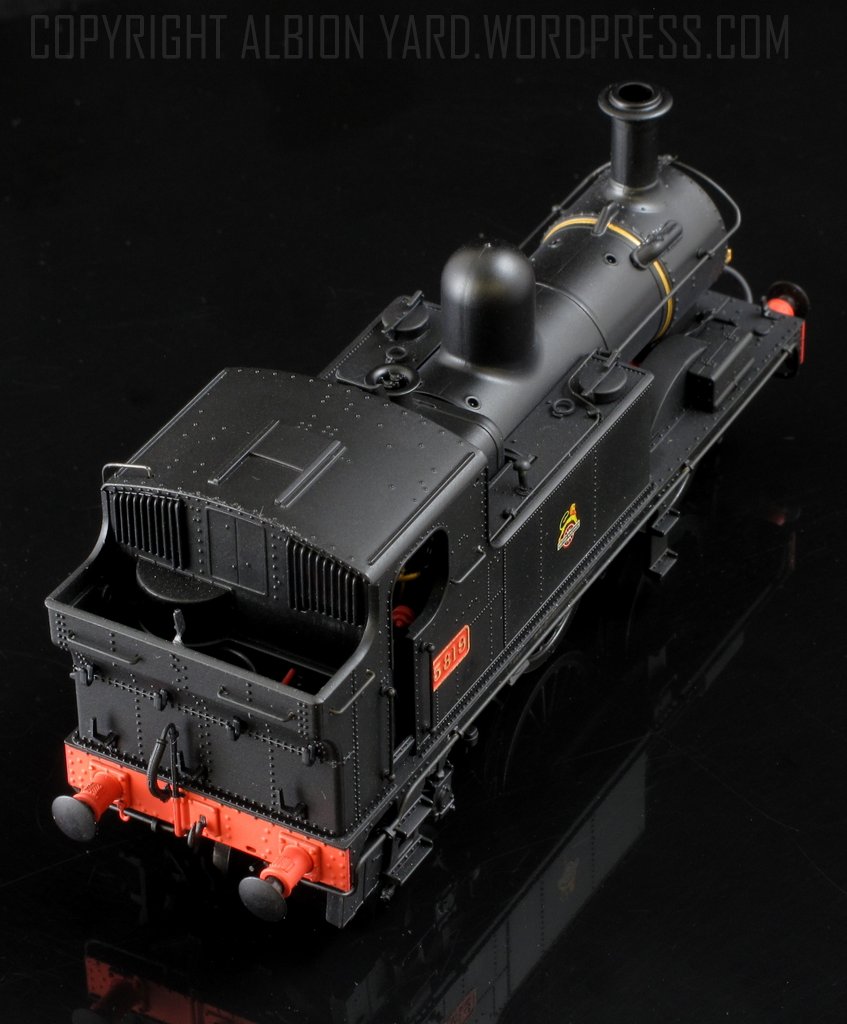
Rear cab windows and their associated protecting bars are well captured, allowing good transparency and light in to the cab. The boiler fittings chimney and dome are for me, ‘not quite there’. The chimney particularly where the base flare meets the vertical stack is too clearly defined, it should be much more subtle, conversely where the dome meets the boiler, the join is too subtle with the dome seamlessly transitioning into the boiler. There is a significant variation on the prototype on how visible this join is, on some engines it is visible but virtually seamless, on others it is very apparent, particularly above the boiler band strap which sits beneath it. Undoubtedly a factor of the panel beaters trade! The dome itself looks to be about 1mm too high perhaps accentuated by the lack of the seam line around the base. The boiler band strap is also missing on this model to represent this join between dome and boiler one of the tasks I’ll consider is adding the missing boiler band with a lining decal, and scribing the missing seam line, or perhaps using an Archers weld line decal to show the join line. The mould line for the boiler runs top center along its length and on this example almost invisible.
Hattons 14xx 48 xx 58xx
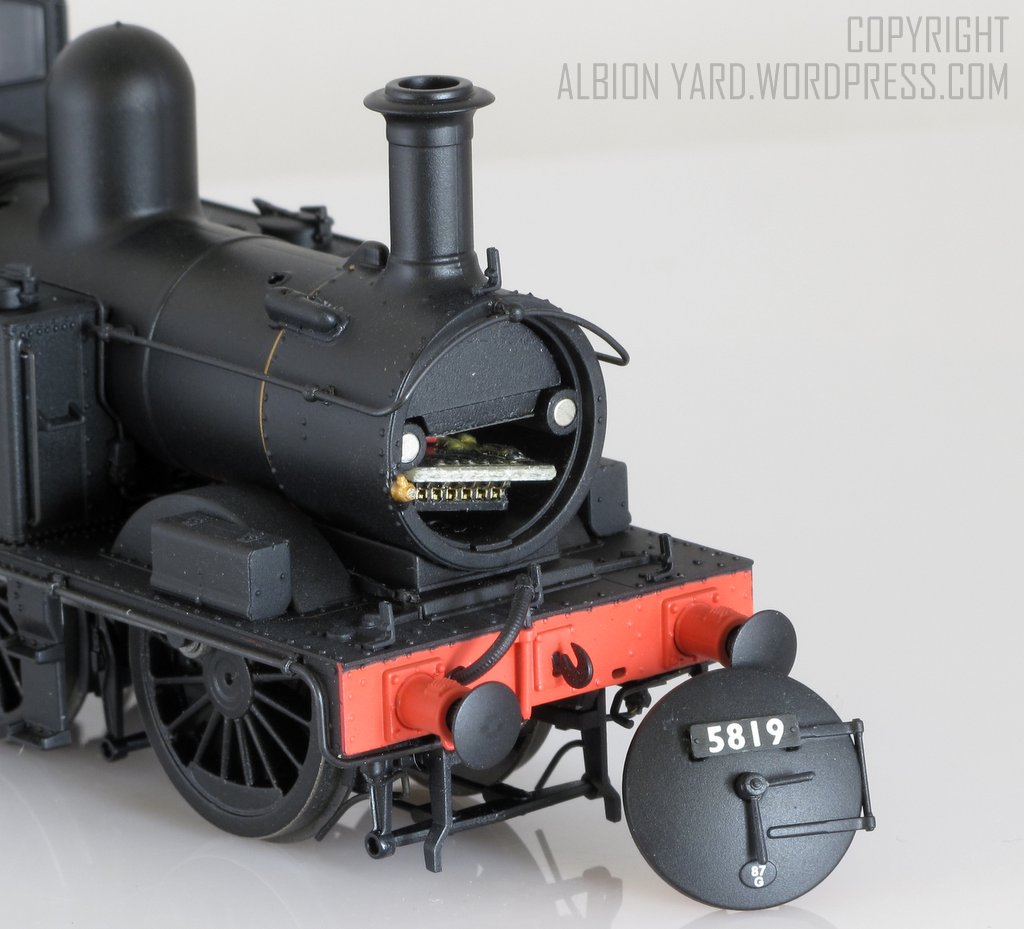
The cab front plate has a couple of small mystery holes at the bottom near the whistle guard, none of the images I’ve got access to show these holes, on any of the three classes in the Hattons range, a simple dab of paint will fill those. The front cab windows are slightly too square at the corners and should have a more rounded corner. The front of the cab is double skinned the backhead and faceplate being separate to the cab front. This gives a thick appearance to the front of the cab and window section, and for me will mean that I do some work here to ‘thin’ the cab front plate.
Hattons 14xx 48 xx 58xx
H1410
Whilst on the cab the locomotive number plates are etched and recessed into the cab side. This gives them an incorrect flush appearance, as I’m changing the locomotive identity anyway I’ll either remove them of just overlay them with appropriate plates. The Hattons cab plates are just covered by a Modelmasters plate so if you’re changing the identity of yours I don’t foresee any problems. It’s an element of the design I don’t like, the Great Western plates were noticeable, standing proud of the cab sides and this feature removes that. The model is fitted with sprung buffers, unfortunately the springs within them are far too stiff, for me, who actually makes use of the sprung buffers this is frustrating, and makes them ‘worthless’ as an operating feature.
Hattons 14xx 48 xx 58xx
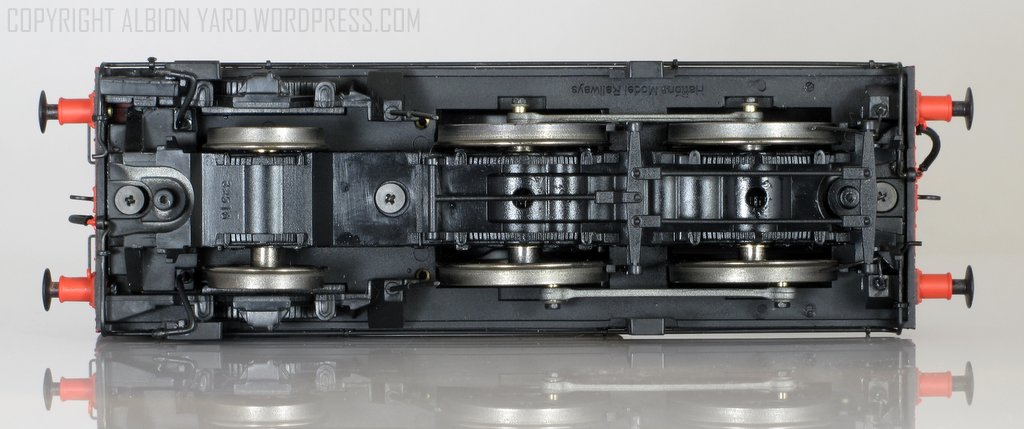
It has a fully geared chassis similar to previous DJM design releases where the gear train provides drive to the axles and the coupling rods are cosmetic. I’ve tried the locomotive with both DC and DCC. On the flat it runs tolerably well but not as good as other recent releases J50/USA/Peckett, this doesn’t mean it’s a bad runner, just not as good. For shunting the locomotive doesn’t exhibit the same finesse of control that the previously mentioned examples have, occaisionally exhibiting a ‘cogging’ movement. In reverse the locomotive exhibits a slight jolt as it strikes the frog on a Electrofrog Peco Code75 curved turnout, the back to backs appear good so I’m left wondering if this is a wheel profile thing, the J94 also did the same, and only with that particular curved turnout. No other RTR stock or finescale wheel set shows the same problem. The DCC control test was performed with an NCE Powercab and Gaugemaster DCC28 decoder. With the decoder fitted the running at low speed is good with no cogging evident, as it transitions from low to medium speed there is a rapid acceleration. As this doesn’t occur in DC my feeling is that it requires the CV’s adjusted to match the decoder, as I don’t use DCC as a rule this fine tuning adjustment is outside my scope of interest, for DC the running is good but not excellent.
Hattons 14xx 48 xx 58xx
H1410
Fitting the decoder is relatively simple. The smokebox door is removed and the decoder board pulled forward. It takes a six pin decoder, but take care when pushing the decoder back into the boiler. There’s limited space and one of the wires came adrift on mine which took a bit of searching to resolve the problem as it was so difficult to see.
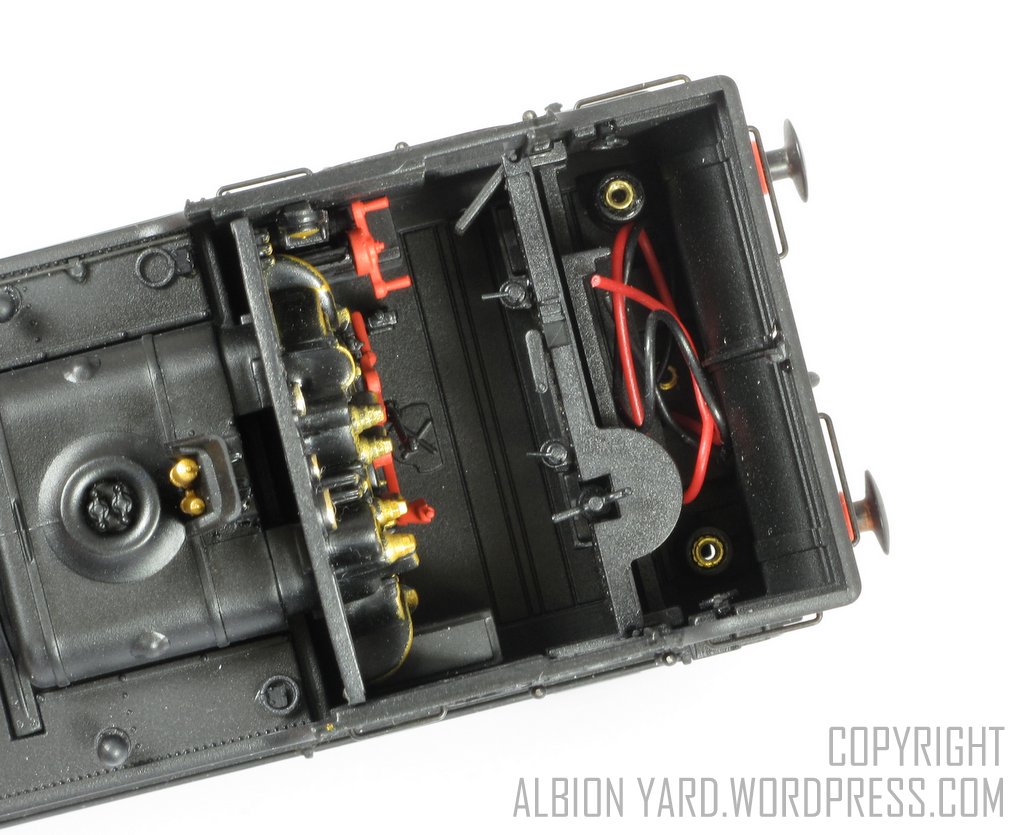
Hattons 14xx 48 xx 58xx Cab Internals
Sound can be fitted, there’s space and wires inside the bunker to fit a small speaker which is a nice touch. Having recently fitted a Loksound micro into a 64xx, I’m not convinced there’s enough room in the boiler space without a bit of work to fit with this model. Other decoders may of course fit without a problem, there no recommendation in the instruction for a particular type, which would perhaps have been useful.

Hattons 14xx 48 xx 58xx
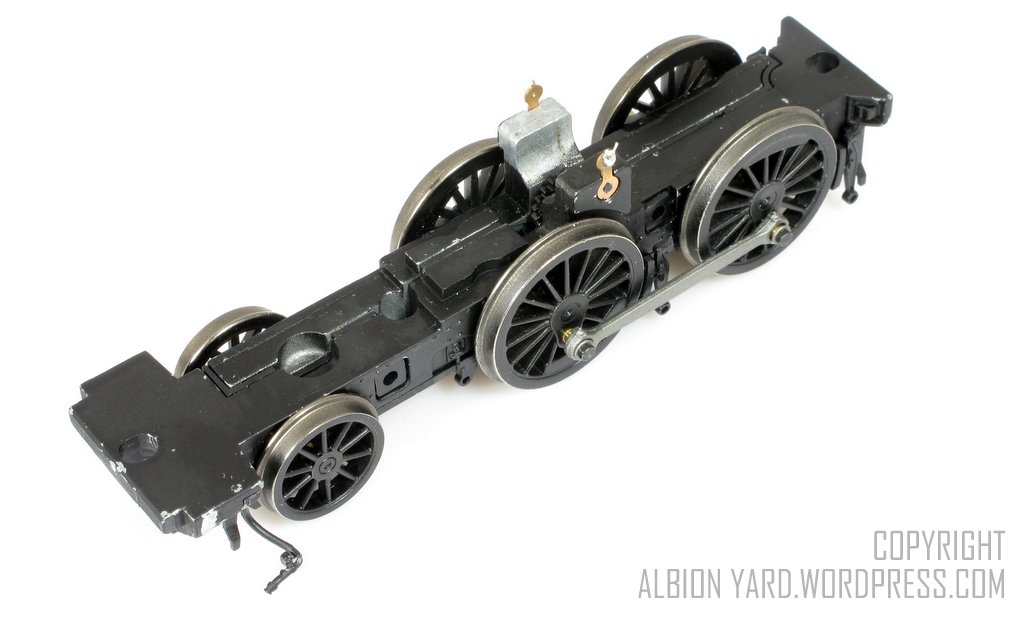
Visually the chassis is a mix of good and not so good. Like the J94 there are cross head screws that are visible in the side of the chassis. Probably not a deal breaker for most but as my layouts are set at a track height of about 50 inches, this is noticeable on my type of layout. That also leads to the brakegear which is incomplete, the pull rods should run the length of the locomotive and finish underneath the cab, on this model they end behind the second set of driving wheels. This also highlights the lack of the ashpan which hangs between the rear drivers and rear pony truck so the profile of the chassis is too regular and this is quite a noticeable feature. Both of these omissions are quick and easy fixes, for the likes of the cottage industry detail trade perhaps some low hanging fruit for a detail and improvement etch.
Hattons 14xx 48 xx 58xx
At start using DC (Gaugemaster ‘W’), depending on where the coupling rods are sitting you can see the drive axle (centre) rotate a fraction before the leading axle. In DCC the rotation isn’t apparent, they both move simultaneously, very odd. The coupling rods have significant slop around the crankpin, exactly what we’re told to avoid as chassis builders, there’s also significant lateral movement on all three axles. One of the benefits of this type of geared chassis is reported to be improved running, so far that claim doesn’t match my traditional kit built or RTR chassis using a ‘simple’ single axle driven gear. None of the axles has any vertical movement. On ‘Shelfie’ my Cameo layout, the fiddle yard in its current configuration hangs at an incline of 2 degrees. There is an almost imperceptible dip in the track on the fiddle yard, on the downhill direction at low speed the model shows a tendency to bind at one particular point. The track is Streamline CD75 and I feel it’s likely to be a motor/drive train peculiarity. The chassis when disconnected from the body and motor gear worm, will freewheel though this same section unhindered. If a locomotive has no vertical movement at all and limited weight this simple dip can cause wheel spin as the model passes through the gradient transition, this occurs with this engine, when pushing five normal Bachmann 14T tank wagons. It also occurred with the Oxford Adams Radial prior to the front bogie modification they subsequently made.
Hattons 14xx 48 xx 58xx
H1401 H1402 H1403 H1404 H1405 H1406 H1407 H1408 H1409 H1410 H1411 H1412
H1413 H1414 H1415 H1416
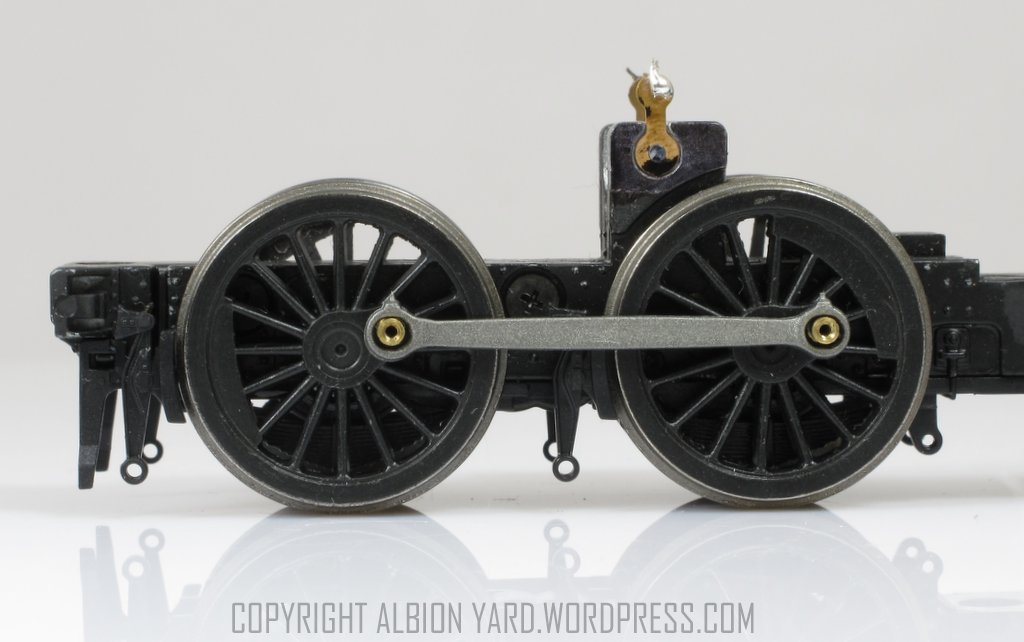
More weight will likely resolve this issue, without the speaker fitted in the bunker I may well add a bit in there. As far as the running goes I’m wondering if the rods are improved, and side play reduced, if the low end running will respond accordingly. The crankpins seem over length to me even allowing this is to run on second radius curves, with both lateral axle movement and fore and aft movement of the rods then I think some of the running qualities have potentially been compromised. Looking closely at the coupling rods they are painted silver, Larry Goddard has improved his by dipping them in cellulose thinners to remove the paint, and following his example I’ve done the same. The reason for the coupling rod slop is apparent as soon as you remove the crankpins and washer, the rods have oval crank pin holes. Prior to finding this I thought there may be the opportunity to improve the rod fit by bushing and re drilling them. This clearly won’t work easily so I may try a set of Gibson 4M75 coupling rods to see if they improve things. Again bear in mind the running isn’t poor, just not as good as I personally want or expect from contemporary releases.

Hattons 14xx 48 xx 58xx
With an interest in EM I had a look at the practicality of a conversion. The first thing that jars is the driving wheel size, just over 1mm too large in diameter and the bogie wheel about 0.5mm too large as well. The overlarge driving wheel gives rise to a slightly enlarged front splasher too. They are all in proportion to one another so it doesn’t shout out that they’re oversize except for when you start coupling stock which has a correct running height. As a three link user this is annoying but I can live with it for the time being. The split chassis design and gear train means that a straightforward wheel swap isn’t an option, perhaps the easiest route being a High Level chassis substitution, which will resolve the excess diameter wheel problem and give suspension too.
Hattons 14xx 48 xx 58xx
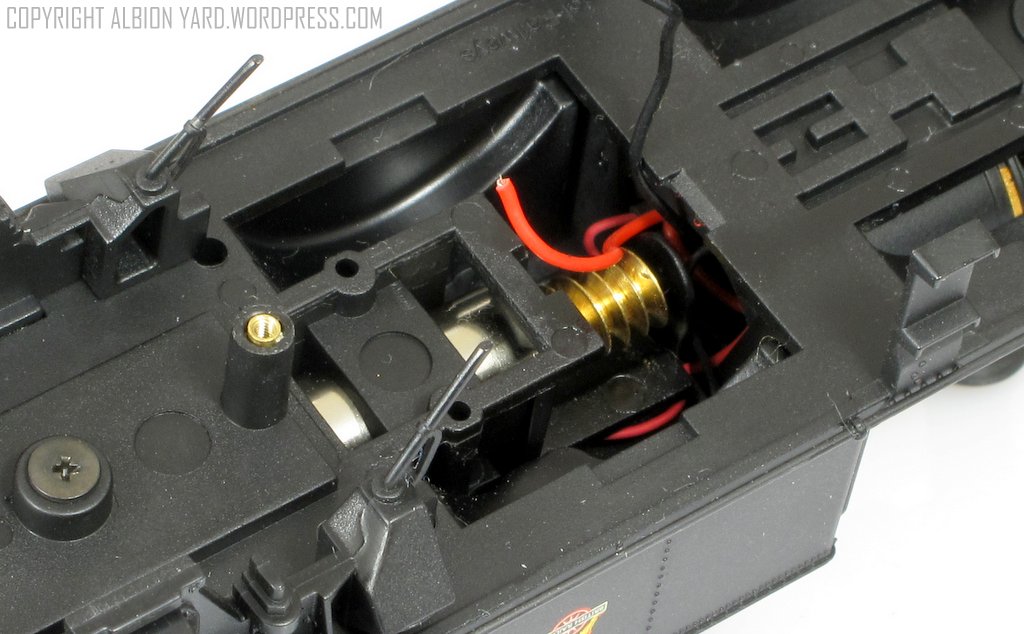
Motor installation looking forwards
Hattons 14xx 48 xx 58xx
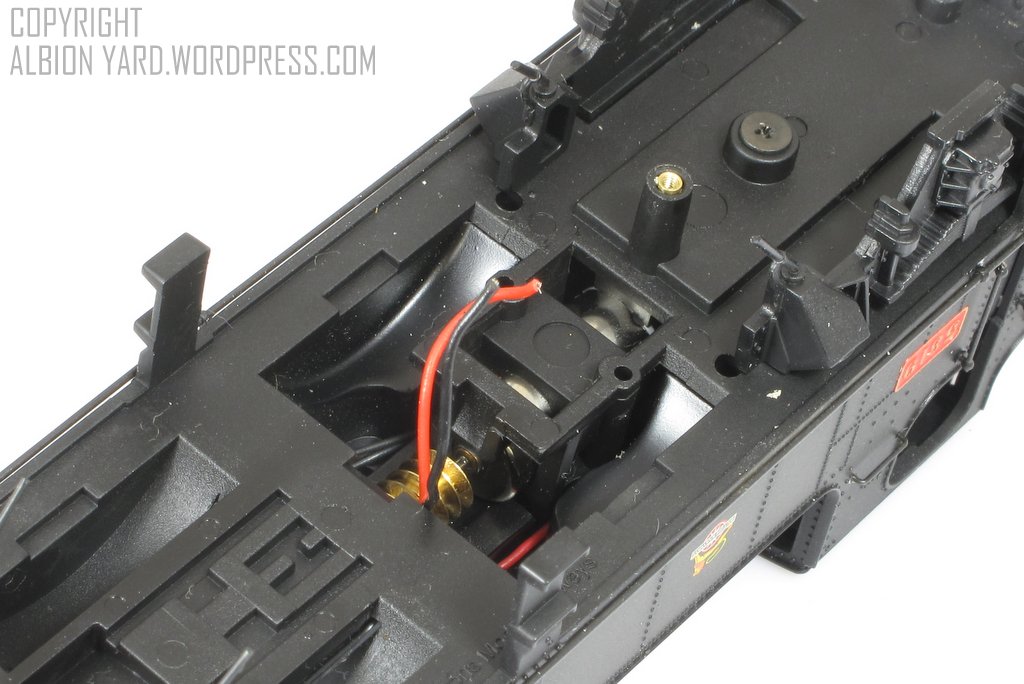
Motor installation looking rearwards
The existing chassis is hardwired to the motor leads meaning that taking the model apart for maintenance is challenging. In the event of a motor failure the chassis will need to be removed. On this model the rear injector pipes are glued from the chassis to the footsteps meaning cutting them or as I did breaking them away from the rear steps. The vacuum pipes need disconnecting at the buffer beams, and the front sandpipes need to be twisted clear of the front brake hangers to allow the chassis to be removed. The fixing is one screw each end of the loco underneath the NEM coupling socket, and one between the central sandboxes. The chassis will then come away from the body and the leads will need to be unsoldered to allow any further work.
Hattons 14xx 48 xx 58xx
So what do I make of it overall? It’s a bit of a curate’s egg for me, there are some really good bits and others where I’m left thinking, why? It captures the look and character of the prototype, the detailing and decoration are very good, as is the fit of components. The fit of the cab roof and how it separates is exceptional the join lines being invisible, far better than the Bachmann 64xx. The nameplates being recessed for me isn’t a big issue, a very simple fix with aftermarket sets. The short brake gear and lack of ashpan is frustrating but like the cab plates fixable with little effort. The wheel diameter oversize is just odd, no logical reason I can think of unless it’s a drive train/gear size requirement. And the impracticality of doing maintenance is just frustrating. It leaves me feeling a little deflated, it’s better than the J94 from the same design stable, but the overall performance not as good as the Hornby Peckett for example. We should recognise a small 0-4-2T is always going to present challenges to a manufacturer, particularly getting weight and traction down effectively and to be cost effective to produce. Hattons/DJM have managed it to a degree, overall it looks excellent and performs well, certainly for most of the market it’s aimed at. But it’s still not lighting any fires here. For me that reason lies within the chassis and drivetrain, it’s just not as effective as it should be.
Would I get another one? I don’t know.
If I could get a body and fit the High Level chassis, undoubtedly yes, I would…

An interesting and detailed ‘tear down’. I have been holding back from ordering one for a variety of reasons, not least ‘The Western’ is not my main interest and on balance I’m glad I did. Good point about the dome. You say it is a bit tall and in the pictures doesn’t seem quite right compared to the prototype. I wondered if it is a little under prototype diameter? Might be worth running a micrometer over it.
The quality of running is a really interesting issue. Looking wider the Beattie well tanks are a good example. I have three (two original one DJ) which ran beautifully on unpacking. I did have a fourth from the second batch courtesy of DJ (different liveries, so many well tanks doesn’t make me a bad person, okay!) but returned it as it ran like a dog and Kernow didn’t get it back to me fixed so I got a refund.
My Hornby Adams Radial ran like a dream out of the box. My Peckett needed running in and still isn’t quite right and I returned the first one. Good enough is my current verdict.
I could go on, but think this illustrates a point. I am inclined to think that the issue isn’t about chassis design etc. it is about that good old fashioned issue quality control. For example I bought a Hornby Terrier that ‘clicked’ in one direction. I moved the gear wheel on the driving axle probably a fraction of a millimetre and running improved straight away.
So it would be interesting to get a bunch of 14xx (and other locos) and test them from the box, run them in and see what remedial work is needed to finesse their performance.
The prototype is quite delicately proportioned, and this shows particularly underneath the footplate. The wheels on the model, even allowing for the demands of 00, are heavy and also look too large, upsetting the finesse of the final product – not helped by the prismatic effect of the moulded spectacles!
What size are the wheels?
Simon, 21.5mm on my example.
5’4.5″, plus the overscale flange. Oh dear, far too big. Apart from the extra 3″, why don’t manufacturers make the wheels to scale over the flanges? Reproducing the wheels on the prototype could remove up to 3″ over the years before a new tyre was required, so such an approach would be perfectly acceptable.
Odd isn’t it. Bizarrely for me the oversize doesn’t jar as I mentioned in the review the wheel and splashes ‘match’ far better than on other RTR releases and that masks the issue, it sort of looks right even though it’s wrong…
Hi Indeed !! What IS the diameter of the driving wheel ?? I have had 3 sizes from owners and another from Hattons. Not surprisingly the Hattons diameter of 21mm is the nearest to correct with the others being 21.2mm; 21.5mm and 21.9mm. For a 4mm scale RTR model the size should be 20.0mm especially if the splashers have been extended inwards to cover the wheel flanges, as is the case with this model. I am perfectly well aware that the FULL SIZE wheels are 5′ 2″ dia, but this is the AS NEW size and with regular re-turning at general overhauls the diameter would progressively reduce to about 5′ 0″ before the wheels were re-tyred.
Even with modern RP25 profile wheels it would not be possible to fit 20.67mm wheels under scale size splashers unless the splasher tops were scale thickness. DEAD SCALE wheels vary from 20.67mm to 20.0mm and it seems extraordinary that this model actually has wheels larger even than the maximum scale size let alone the minimum.. The splashers must be very significantly oversize and the position of brakeshoes compromised as well to accommodate such an error.
Other disappointing points are that the performance is somewhat compromised and the possibility of providing compensation was not investigated. This provides vastly better adhesion for unbalanced O.4.2 and O.4.4 etc locos especially when, as in this case, there is very little weight up front. It is also a shame that the original “as built” versions are not catered for, due to the bunker steps and the original design of sanding linkage below the smokebox door.
There is another annoying error as the “LEDGES” either side of the smokebox saddle are completely absent. They are quite prominent but photos of the model show no evidence of them. Nor have the packers behind the buffers and coupling hooks been removed on the non auto fitted 58xx class. The last photos shown of the “Improved” backhead still showed much detail offset to the left, has this been redone in production ?? Definitely a curates egg with some very nasty smelling bits, just like the Kernow O2.
Hi Adrian, I’ll try and measure the wheels properly this weekend, am away from the bench for a day now. Trust you’re well :0)
Hi Adrian my example drivers 21.5mm. Brgds
Hi Early experience with split frames on the EAMES O4 Diesel motorising unit for the Airfix kit and Palitoy/Mainline’s J.72 makes me suspicious of any such design although DJM has made the best of the system by having the plastic “Muffs” inside the metal axles which prevents splitting of the plastic. Sadly I do not think the geared drive on this or the O2 is a good idea, especially as the 14xx appears to have no vertical play in any of the axles. The Centre of gravity of the 14xx appears to be close to, if not behind, the rear driving axle. can anyone try to see where the balance point is ?? The further back it goes the less weight will be on the front wheels until at the point where balance is on or behind the rear axle there will be NO WEIGHT on the front wheels on the level or with track having a dip under the front axle. This makes it very easy for any jolt etc to make the front wheels lift off and derail the loco. Similarly if the trailing wheels have no vertical movement or springing they will carry no weight unless the balance is behind the rear drivers.
The loco is effectively a rigid O.6.O with only two wheels driven and the suggestion of driving the trailing wheels would work, especially had the ashpan been included to hide the gear train, Unfortunately there is a large screw exactly where the gears would go. The loco only needs as much sideways play as for e.g. a 57xx as the overall wheelbase is the same so I am not quite sure why there is so much on this model. The design has been compromised by having so little mass at the front end. It should, in my opinion, have had a diecast smokebox/boiler unit to the front of the firebox with Dave Jones’ favourite Tungsten ballast weight from the front as far back as the mechanism. Surely there is enough room in the sidetanks for DCC and sound fittings??
To provide better traction and trackholding I wonder if one solution might be to remove the drive gear to the rear drivers and fit proper coupling rods but importantly allowing the rear drivers to be sprung vertically thus ensuring up to 50% of the weight on the front wheels, better pickup and a good percentage of weight on the rear wheels. It’s not compensation as we know it (sorry Trekkies) but it would allow the axles more chance to follow track irregularities. It effectively becomes a compensated O.4.O assuming the trailing wheels are centrally pivoted with a sprung set of drivers in between. to aid traction and pickup.
Sideways play does seem to be very wide, being charitable I wonder if this is for the tension lock coupling design, and ensuring it works effectively to first of second radius. Using three links that isn’t an issue for me it that’s the case. I’m not sure we ‘ll see many derailment issues, the road holding appears good without needing Lima pizza cutter flanges. On a simple case I’d say yes more weight needed, the design I feel might allow better weight and DCC component placement configuration, how that stacks up in terms of manufacturing efficiency and lead time I dont know, but it’s clearly another area that could add cost to the end product.
Hi I am not sure if the wheel sideplay is actually a good idea re the couplings as the loco might tend to crab when it encounters a curve. This might well help when pulling a tail load but this is an Auto tank and would be expected to propel much of the time. When it encounters a curve the body and chassis would tend to carry on in the original direction and the wheels alone would follow the curve to start with which would not be of advantage to the TL couplers.
Re the DCC fittings with sound, I only have small, one engine in steam, type layouts so am not a fan but with the very small motor I would have thought having these units alongside the motor they would fit inside the tanks. It would also simplify wiring although I don’t much like the idea of the motor in the body instead of fitted onto the chassis. I assume this is the case and means the loco cannot be run without the body in place. Is this correct ??
Adrian, you’re correct ref the motor chassis split, as seen in the pics above. I’ve not heard of any ‘crabbing’ issues with them so far.
I can’t see any advantage of this over the Airfix/Hornby model, particularly once the latter has been breathed on and figured to a decent chassis. As the basis for a finescale model, it is hard to see what this brings to the marketplace that isn’t already available. As an RTR model, it really needed to be top notch to be worth the development effort.
I can’t see what the rationale was behind this selection: it has different issues compared to the Hornby model, so doesn’t supplant it. With so many prototypes to choose from, why this? A 2021 pannier tank would have been more useful, and the chassis could also have served for the saddle tank version (and at a guess, the 16xx?)
It’s a pretty and long lived GWR to end of WR steam. The Hornby/Airfix is long in the tooth so a contemporary remake of it was a realistic punt IMO. This, in particular the chassis, should have torn the backside out of the older model. It doesn’t though…
Hi Simon Certainly agree and your comment re 2021 is spot on, the basic chassis can be used for all 3 (I know because I have been producing 7mm 2021 kits for years) I have a bastardised P4 layout (EM wheel standards , but don’t tell anyone)!!, and already have a 14xx for this layout and an 850ST which with came with the layout from Martin Finney, so you can imagine how nice that is, even though over 30 years old. I would have bought a Hattons 14xx and fitted my existing chassis but the splasher problem means I might have to think again. The Airfix body is no better, indeed perhaps not as good. Mine was re-chassied in a hurry for an exhibition and has never been upgraded but works OK. It’s existing Airfix chassis sits forlornly in a box and, because it was the original, was always a disaster, especially the plunger pick ups.
The 2021s and the 1600 cover a much longer timespan with loads of variants although they are a minefield like the 14xxs. There are loads of liveries although not quite so gaudy. 2021s were auto fitted and two even had dummy coach bodies fitted. Talking to RTR manufacturers is usually less rewarding than talking to a brick wall, at least you sometimes get an echo back from a wall. Suggestions such as this will probably go right over the heads of the RTR fraternity.
Posts today on the Hattons 14xx site ( 17/4/17) show pictures of the backhead at last and as suspected the tooling was never modified to correct the strange “slumped to the LH side” of most of the fittings, There were excellent pictures of the prototype (post 287) and model (post 335) which clearly illustrate the problem and although it was claimed this was being corrected, it clearly is still the same. Just as well it is difficult to see unlike other errors which are rather more obvious.
I’ve just about got my head around what my ‘improvements’ will be. The primary changes are cosmetic, the chassis design not lending itself to significant running improvements. Whilst on the flat the performance is ok, it’ll move over 460 grammes without slipping, the downhill cogging is still ( frustratingly) defying a solution.
My Hattons 58xx arrived minus its front vacuum pipe, but my impression as an overall operations and scene-setter, and non-nit-picking dimension-checker I was impressed with the appearance and attention to detail. It ran well straight from the box apart from an unexplained gear-train lock-up sorted out by a bit of wheel-waggling. Soon afterwards right in front of my eyes it spat out a front buffer and spring. I never found the spring and the retaining collet (hah! – Collett). No matter, the buffers are non-functional so I just superglued the buffer shank back in place.
Maybe the vanishing collet got into the gear-train.
Then I ran it on my 1 in 30 incline and oh dear! It hung up on the rear axle and front drivers with two vans and a Toad brake van in tow on the transition. It also slipped on a 22″ curve with the same load, even after track and wheel cleaning. The model is very arse-end heavy, despite a weight inside the boiler/smoke box, and on level track the front drivers are a sheet of A4 printer paper away from making contact with the rail. I wonder if this is deliberate to try and ensure that the adhesive weight lies mainly on the rear driver. See below.
My old Hornby 14xx (also arse-heavy) manages two gunpowder vans, two barrier wagons and the Toad with careful driving, admittedly after adding 25g at the CAB end to ensure that the traction tyres actually make contact with the track, given the excessively robust preloading of the compensated rear axle. (This may seem very counter-intuitive given that the rear axle is directly below the cab but I’ll be happy to explain if you wish).
The Hattons/DJ) model cries out for compensation of the rear axle and maybe (God forbid!) traction tyres because there is little room at the front end to add more weight forward of the rear driver contact point on the track.
A final question. I run on DC. Can I extract any of the electronics clutter in the smokebox to add maybe 30g of ballast to let the rear axle hover 0.1mm in the air? 1g of liquid gravity down the chimney will do nothing.
I see this is an old topic but a new one to me so here’s my observations. I got mine a couple days ago and installed a SoundTraxx Econami ECO-100 sound decoder with the UK steam sounds. The decoder slides into the boiler slot, just barely and I had to hard wire it to do that. I tried installing a sugar cube speaker into the coal bunker but without a proper enclosure the sound was poor so I installed one with an enclosure inside the cab roof. Since it is black it is easy to overlook and a crew will help hide it. In the future I may cut the enclosure down a bit to help hide it.
The real issue comes with the lack of space for a keep alive. Due to the problems mentioned in this review it is VERY susceptible to intermittent power disruptions which in DCC terms leads to stop and go performance. If I can get it apart per the description given here I will run an additional pair of wires to the bunker and install one of the tiny new TCS Keep Alive devices which should result in better performance. I write the DCC Corner column for Model Railroader magazine in the USA so this is a challenge I hope to solve for our readers who also might be interested in UK steam.
Larry Puckett
Contributing Editor
Model Railroader magazine
Thanks for your thoughts Larry, I’d be interested in those keep alives too, finding space for them is a challenge in some of the smaller UK locomotives
Brgds paul
After working on it for the better part of 2 days I finally have this locomotive running like a fine watch instead of a 50 year old washing machine. Using the excellent details provided in Paul’s article I tore the loco apart and ran an additional pair of wires back to the coal bunker alongside the pair for the speaker. I fit a sugar cube speaker and enclosure in the space below the false coal load and ran the extra pari of wires up into the cab along the back wall between the windows. Using double sided foam tape I attached one of the tiny new KA2 keep alives (from TCS in the USA) to the middle of the cab roof. With its green wrapper it blends in and once I get a crew installed I hope they will disguise it completely. These are 8.9mm x 8.9mm x 15.5mm and are the smallest keep alives available to my knowledge.
With that done I cut iut the 6 pin connector and hard wired the 8 wires to the decoder and carefully squeezed it into the boiler. There is just enough room for the ECO-100 UK steam decoder to fit and it leaves a small amount of space behind the boiler door. There also is a small amount of room under the decoder and also on each side. Using all these little spaces I shoved the wires back in all around the decoder and rejoiced when the magnetic boiler door popped into place. This all wasn’t done in one sitting as I ended up disassembling the loco again as a wire was rubbing against the drive gear.
With the decoder and keep alive installed I ran the loco on my HO scale layout and it doesn’t skip a beat now whereas without the keep alive it danced all over the track. The light weight, limited number of pickup wheels, short wheelbase, and rigid wheel suspension all result in intermittent losses of power which plays havoc with DCC. However the keep alive maintains power even over dead frogs and dirty track as well as intermittent power interruptions like these. Consequently operations are smooth and sound is not disrupted.
Let me say that this installation is not for the novice. I have been installing decoders for 25 years and was challenged by this one myself. However if you can tear down this little loco as described in this article and have some experience installing decoders it is doable. I would do a step by step article on my http://www.dccguy.com website but that would require tearing it apart again which is something I do not plan on unless there is a catastrophic failure. If there are any question I’ll be happy to address them here so long as Paul doesn’t mind.